In the days before coming home for Christmas I had some Ida Red apples that were a bit mealy for fresh eating but not too far gone for cooking, and a husband who hates raisins with only raisin bran in the house for cereal. This was my solution. It's pretty basic but it turned out very well so I thought I would share. Now I'm typing it from memory, but I think I have the proportions right.
Apple Cinnamon Oatmeal
2 tbsp butter
1 apple, peeled, cored, and roughly chopped
1 tbsp cinnamon
2-3 tbsp brown sugar
1 1/2 c water
1/2 tsp salt
1 c old-fashioned oats
Melt butter in skillet while you cut up the apple over medium. Add apple, brown sugar and cinnamon. Stir to coat. Continue to stir periodically while you make the oatmeal. Turn it to low if you start to fear burning or mushy apples while you wait for the oatmeal. Meanwhile, bring water, oats and salt (I'm a big fan of salting all oatmeal) to a boil in a saucepan . You can wait to add the oats until after the water reaches a boil for a chewier texture. After you add the oats stir very frequently to prevent sticking, turning down the heat if it threatens to boil over, until the oatmeal it a texture you like. Remove from heat and stir in the apple mixture. Enjoy.
Merry Christmas!
Wednesday, December 26, 2007
Sunday, December 9, 2007
Daikon pickles
 If you've ever been to a Korean restaurant, you were probably presented with an array of side dishes (banchan) to accompany your meal. I love the side dishes as much as the main meal (though it gets close if the main meal is kalbi or bulgogi.); together, they make a great combination: a hot main meal that contrasts nicely with the cold, vinegary, often fermented banchan. The most well known example of banchan is kimchi, spicy fermented vegetables; the background of the above photo is some kimchi I bought from a store made from napa cappage, which is a classic kimchi ingredient.
Another dish I love that my favorite Korean barbeque place serves (the New Jang Su, for those of you in the Boston metro area) is pickled daikon slices. Daikon is a mild large white radish most frequently associated with Japanese and Korean cuisine. I've also eaten daikon in mooli parathas, which is small pieces of daikon (mooli) in an Indian flatbread (paratha).
 Pickled daikon can be addictive - the vinager and sugar combination mellows out the radishy sharpness of the daikon. With a little help from the internet and some experimentation, I present my version of pickled daikon, shown in the top photograph in the foreground (if anyone knows the Korean name for this dish, please let me know!):
Pickled daikon
-0.5lb daikon (one smallish root, 2.5" dia, 10" long - scale up the entire recipe if your daikon is bigger)
-1tsp kosher salt (I used coarse sea salt since I didn't have kosher salt at hand and I think it worked out fine)
Korean red pepper to taste (I didn't have any of this, so I used Penzey's aleppo pepper, which I thought worked well. Other recipes suggest a bit of cayenne pepper as another possible substitute.)
3 tbsp white vinegar
1 tsp rice vinegar (optional; you can change the ratio of white vinegar to rice vinegar to suit your tastes. I find the flavor of rice vinegar alone to be a bit strong.)
3 tbsp white sugar
1. Slice daikon into slices as thin as possible. You should be able to see through the slices, as seen in the above picture. You could also cut the daikon in strips, but I like the way the slices look.
2. Salt daikon slices and let sit for ten minutes.
3. Rinse daikon and put in bowl.
4. Toss in pepper
5. Add everything else (both vinegars and sugar)
6. If liquid is level is too low, add a bit of water.
7. Cover and let daikon sit overnight in refrigerator in vinegar and sugar mix.
According to what I've read, the daikon should be good for a few days stored in the refrigerator.
 Aww, look at the picture of the baby daikon radish on my chopsticks!
Saturday, December 1, 2007
Yay Thanksgiving! Food, fun, and the doorway to the Christmas season, does it get any better? Let me give you a look into what happens when my mom gets Thanksgiving going. 
We also have stuffed mushrooms and antipasto from the Italian component of the party.

A little Thanksgiving champagne!
My dad still insists on mashing the potato by hand. I only use the standing mixer. Somehow, his are still smoother.
I actually, think this is a pretty clever way of keeping gravy warm.
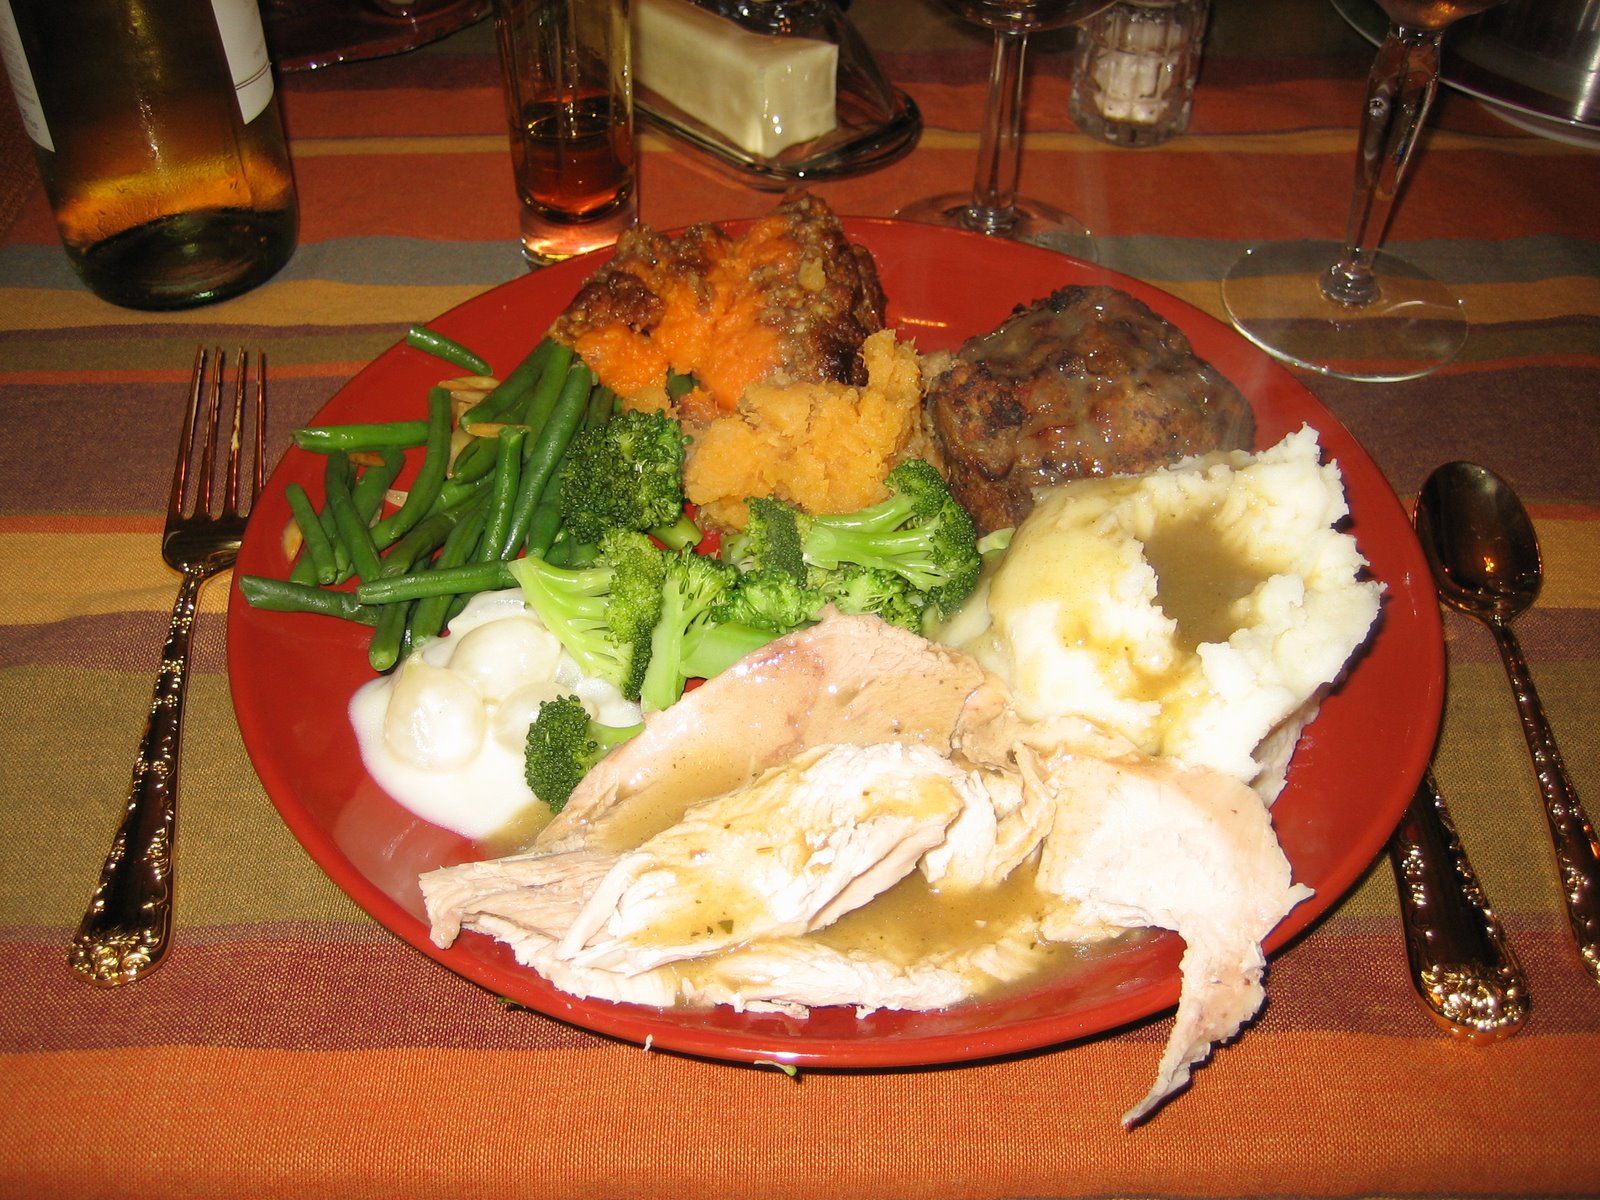
The final result. We have green beans, sweet potatoes, rutebega, stuffing balls, mashed potatoes, turkey, and creamed onions, and brocolli. Note the Thanksgiving Tequila at the top, as well.

Well, this is getting long and picture heavy. I just thought I'd share some Thanksgiving fun. Hope everyone else had a nice Thanksgiving as well!
First, we had to choose a wine. My dad and I had a bit of a disagreement. He thought white, I said red. While I agree that white wine often goes well with poultry, Thanksgiving is about hearty food and overeating. That sounds like red wine to me. I convinced him to go with a couple Pinot Noir's. I'll update you on the results.
This is Brie with cranberry, caramel, and pecan topping. This stuff is wonderful: a sweet taste from the cranberries and caramel, the wonderful taste of Brie, and some pecans to make it crunch and nice. Unfortunately, I have promised to not give away the “secret recipe”, but I think you can probably figure it out well. Besides, that's what the internets are for.


We also have stuffed mushrooms and antipasto from the Italian component of the party.

A little Thanksgiving champagne!
My dad still insists on mashing the potato by hand. I only use the standing mixer. Somehow, his are still smoother.

I actually, think this is a pretty clever way of keeping gravy warm.

The final result. We have green beans, sweet potatoes, rutebega, stuffing balls, mashed potatoes, turkey, and creamed onions, and brocolli. Note the Thanksgiving Tequila at the top, as well.
Well, this is getting long and picture heavy. I just thought I'd share some Thanksgiving fun. Hope everyone else had a nice Thanksgiving as well!
Thursday, November 1, 2007
Sweet Potato Apple Bake
No pictures of this one yet. Thanksgiving is still a few weeks away, but I was hoping I might start a trend of sharing recipes before the holiday, in the hopes of something new gracing my table this year. There's a bit of a story behind this one. When I was a kid, one of the annual arguments about Thanksgiving dinner was whether or not to add pecans to the mashed sweet potatoes with marshmallows. I liked nuts but my sister always objected. I wouldn't have minded holding them back if it meant one more dish on the table she enjoyed, but she didn't like the potatoes either way! Instead I would hit the leftovers only to find them missing all the marshmallows the next day. It drove me nuts.
Anyway a few years ago someone gave her a baked sweet potato or something and she realized that what she really objected to was the syrup that came with the canned ones we always mashed. That year I was with my in-laws for thanksgiving, so I didn't need to adapt our recipe to fresh potatoes. But my mother-in-law put the following dish on the table which was possibly even easier to make (a big plus for Thanksgiving) and absolutely fabulous. I have high hopes for settling the sweet potato battle with it this year. Anyway, it's a bit unique compared to the ubiquitous casserole so I thought I'd share this recipe in preparation for the holidays.
Sweet Potato Apple Bake
4 microwaved sweet potatoes
1 cup sliced tart apples
1/4 cup tightly packed brown sugar
2 tablespoons butter, cut into pieces
1 teaspoon cinnamon
1 teaspoon salt
Peel and slice potatoes. Place layer in greased baking dish,
cover with 1/2 the other ingredients, continue layers and finish with
potato slices and few dots butter or margarine.
Bake, covered, in 375 F oven 30 minutes; uncover, and continue cooking
until apples are perfectly tender and top potatoes nicely browned.
Serves 4.
Note: with apples that have little juice it may be advisable to add 2
tablespoons water before baking.
Saturday, October 20, 2007
Some Fun Cupcakes for Hallowe'en
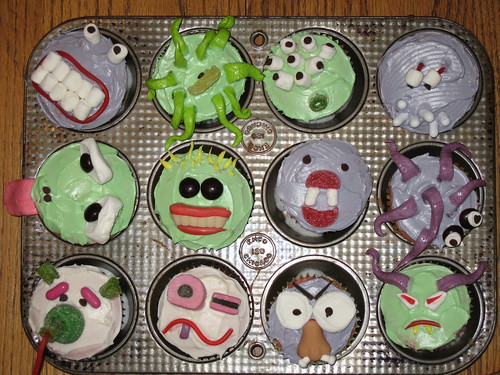
What's more fun that creepy monster cupcakes?
Here are the details for the ones you see at left. And here is the step by step by our friend Martha.

How about bleeding cupcakes?
Make sure you post them if you make them! (Note that I didn't make these, but I will.)
Sunday, October 14, 2007
Farmers' markets: Raleigh, NC. Somewhere in the world, it is still summer.

 Over Columbus day weekend, I was in North Carolina and paid a visit to the Raleigh farmer's market. Summer weather is not over yet there; temperatures peaked in the 90's that weekend.
The climate is reflected in the local produce on the shelves; everything you would find at the height of summer in the northeast is still being sold. Up here, the game is over unless you want apples or winter squash.
 There were a lot of items I've never seen in my neck of the woods. The fresh Dixie Lee peas, in the photo above, are a crowder pea variety. Crowder peas are in family of legumes known as southern peas, cowpeas, or field peas which also include the blackeye peas.
Green peanuts are freshly harvested raw peanuts, typically purchased to make boiled peanuts, a traditional southern snack.

 There were also a lot of home made desserts for sale involving pecans and sweet potatoes, such as the half eaten sweet potato pie modeled at right (the other half was consumed before I got a chance to take out the camera). Sweet and lovely. It makes me wax nostalgic about a fantastic slice of pecan pie fried in butter on the griddle just before it was served that I had in New Orleans once.
 On to the meats! Unfortunately, the pork outlet on site at the farmer's market was closed on Sundays. In the main market, I did find some vacuum sealed pork sides and fat backs (right photo). Pork sides are the part that bacon comes from before it gets sliced, smoked, and cured. Salt pork is also made from this cut. It sort of looks like 3-D bacon. (Also, thank you, Hormel foods, for posting such informative information on cuts of pork! Who knew you were more than just Spam?)
  Fat back appears to be a common component of sausages, or any other recipe that calls for a lot of pork fat.
In the background of the photo of the pork parts, there are rows and rows of jars, which are a huge variety of jams, jellies, preserves, and pickles, both vegetable and meat. I can't really remember them all, but I do remember the pickled eggs, pickled watermelon rinds, pickled peaches, pickled tomatoes, and tomato jam. 
Chow chow is a relish typically made with cabbage, onion, and peppers. According to its wikipedia entry, the southern variety of chow chow tends to be less sweet than the Pennsylvania variety.
We picked up a jar of moonshine jelly, which was quite sweet. The flavor was not very strong - I can't decide whether it was a "delicate flavor" or if it just tasted like nothing. I haven't tried my scuppernong jelly yet. There were fresh scuppernong grapes for sale at the market, which I did not recognize as grapes since they were selling loose fruits off the vine; they were a bronze color I don't normally associate with grapes. I asked the woman at the booth if they were ground cherries, which I've been on the lookout for to try. Duh.
It was fun to go to the farmers' market in another region of the country to see the local specialty farm products. What does your local farmer's market sell? 
Bottom row: Sweet artichoke pickles, apricot and brandy, apricot jam, spiced apple rings, apple pie jelly, apple jelly, apple jam, (some other apple preserve)
Monday, September 24, 2007
One of My Favorite Comfort Foods

Macaroni and cheese and stewed tomatoes. I'll make this quick. Just make them. It takes the same time as that Kraft crap that makes you sick, but tastes better, is healthier, and, of course, doesn't make you sick.
Stewed tomatoes are just wonderful. We used fresh tomatoes, but you can use canned as well. Again, 5-10 minutes and you're done. Easiest, best lunch ever (except perhaps for a fresh garden tomato sandwich).
Stewed Tomatoes
~ 1 Tbs onion
~4 tomatoes
~ 1 Tbs sugar
a little butter or oil for sautéing
1. Peel tomatoes the easy way (score bottom, plunge in boiling water for 30 seconds, then remove, cool, and peel).
2. Sauté onions.
3. Add tomatoes and sugar, and stew for 10-15 minutes.
Macaroni and Cheese (Low-fat)
This recipe is from Cook's Illustrated. I can't stress how good this was, and how nice it was to have it be so good for us.
"
This recipe was published in The Best Light Recipe.I used Cabot 50% less fat cheddar, as suggested by the editors. It was perfect.
Serves 5
Salt 3/8 pound elbow macaroni (about 2 cups) 1 (12-ounce) can 2 percent reduced-fat evaporated milk 2/3 cup low-fat milk (2 percent) 1/4 teaspoon dry mustard 1/8 teaspoon garlic powder or celery salt (optional) Pinch cayenne pepper 2 teaspoons cornstarch 8 ounces 50 percent light cheddar cheese , grated (about 2 cups) 1. Bring 2 1/2 quarts water to a boil in a large saucepan. Stir in 2 teaspoons salt and the macaroni; cook until the pasta is completely cooked and tender, about 5 minutes. Drain the pasta and leave it in the colander; set aside.
2. Add the evaporated milk, 1/2 cup of the 2 percent milk, mustard, garlic powder (if using), cayenne, and 1/2 teaspoon salt to the now-empty saucepan. Bring the mixture to a boil, then reduce to a simmer. Whisk the cornstarch and remaining 1/4 cup milk together, then whisk it into the simmering mixture. Continue to simmer, whisking constantly, until the sauce has thickened and is smooth, about 2 minutes.
3. Off the heat, gradually whisk in the cheddar until melted and smooth. Stir in the macaroni, and let the macaroni and cheese sit off the heat until the sauce has thickened slightly, 2 to 5 minutes, before serving.
PER SERVING:
Cal 360; Fat 10 g; Sat fat 6 g; Chol 40 mg; Carb 45 g; Protein 24 g; Fiber 1 g; Sodium 720 mg
Sunday, September 23, 2007
Buena Comida de Buenos Aires

Hello everyone! It's been a little while since I got back from my ten day journey to Buenos Aires. I thought I'd share with you all a few typically Argentine foods.
Parrillada - Argentina is famous for its beef, and a typical way to enjoy it is grilled on a parrilla. It's just flavorful and juicy and fresh. It's not marinaded in any way but is served with chimichurri sauce on the side. This is a strongly seasoned salsa, with some tomatoes but more peppers, onions, vinegar, and Italian seasonings. My favorite was the bife de lomo which I believe translates to tenderloin. The non-bovine samplings of the parrillada mixta are also worth a go.
Medialunes - These pastries are found in every coffee shop in Buenos Aires, often cheaper than toasta. The name translates to "half moons" which I imagine refers to their shape, which resembles small croissants. They come in two varieties: con manteca (with butter) or con gris (with lard). They are often slightly sweet, the butter variety more so than the lard. My family and I universally preferred those made with lard.
Empanadas - These are basically a pocket of slightly flaky dough stuffed with filling and baked. That description reminds me of Hot Pockets, but these are a million times better. Argentina is one of many countries where they are popular. My impression is that the flavorings of the fillings vary by region - for example, my mother-in-law's beef empanadas resemble those I had in Buenos Aires, where she learned to make them, other empanadas I've had have been somehow different. Regardless, they're always wonderful.
Alfajores - Dulce de leche is a Latin American treat that does seem to be slowly catching on here in the US, at least with Haagen Dasz. It's basically a sort of loose caramel made entirely with milk and sugar, and a little vanilla. I've also heard it called milk jam, usually when translated. You can make a close approximation by boiling an unopened can of sweetened condensed milk in a pot of water for about three hours. If you really make it you have to stir for three hours, or so I've been told. Anyway, it's wonderful stuff, and it occurred to some bright person that it belonged in a cookie, and that cookie/dulce de leche sandwich is an Alfajor. They can be covered with chocolate or meringue, or filled with other things like chocolate and jam, but dulce de leche is traditional and, according to most of those I asked, the best.
Yerba Mate - I'd feel remiss not mentioning this national beverage when talking about Argentine food, but to be honest I'm not too fond of it myself. I think it's originally part of the cowboys on the pampas part of Argentine culture, and can be drank ritually but I'd better not go into details that I don't know and make a fool of myself. Mate is an herb with which one can make a tea-like infusion that has an enormous amount of caffeine. Mate cocido comes in tea bags, and I'm fine with it this style. But the way it's really done is to stuff a container (traditionally a hollowed gourd) full with loose, dry leaves. Then you pour hot water into it and consume with a metal straw that has a filter on the end. You then refresh the water many times. I can't deal with this. I find the strong mate bitter and I've never mastered drinking very hot water through a metal straw and not burning my entire mouth. My husband loves it, though, and he is seemingly joined by everyone in Argentina and Uruguay, and a few other countries too, for all I know. I saw lots of people walking around, mate in hand, and even once saw a man selling thermoses of hot water in the street.
A few other things about food in Argentina. There is no such thing as "a quick bite to eat" as far as I can tell. Take out is meant to be taken home, not eaten on the street. Lunch breaks are often two hours, and that time is needed. You sit, you chat, you enjoy, and eventually you ask for the check and go. I don't think I even sat down for coffee without it taking an hour.
Speaking of coffee, it was universally good in Argentina. They simply do no seem to know how to make weak or burned coffee. Tea came with a pot of water - well, that's becoming more common here. Hot chocolate was super rich and came with hot milk in case you wanted to dilute. They always came with a few cookies and often a small cup of water. I'd order a hot chocolate and get three things on the table.
I was a bit disappointed with the vegetables in general, but there were exceptions. The most common choices seem to be spinach and squash, and neither are my favorites. The cheese was also a bit off. The good cheese was good, but the run-of-the mill cheese had an unfamiliar flavor that didn't bother me at first, but I soon started to avoid.
Anyway, eating didn't take up my entire vacation (though really, a large chunk was spent in coffee shops), but since this is a food blog I'll leave it there.
Tuesday, September 18, 2007
Get Ready for Winter!!!

I love hot chocolate. A warm fireplace, snow outside, a hike through the chilly autumn woods, all require hot chocolate as far as I am concerned.
There's a problem, I love the convenience and taste of instant hot chocolate, but they all contain trace amounts of trans fat. I'm not going to get into my trans fat rant now, but if for starters look here, here, and for a nice unbiased view, here. The point is, there are a bunch of foods like hot cocoa that say they have 0 trans fat, but actually don't. I don't like that, so I'm avoiding those foods.
So, for a while I was just making my own hot cocoa. It's not that hard; you boil some water with cocoa, add some milk, sugar, etc., etc., and in 15-20 minutes you're done.
But that's 15-20minutes. Do you know how long it takes me to make instant hot cocoa? At work, where we have a hot water dispenser, it's on the order of 1 minute. A savings of 19 possible minutes. That's enough time for an Arrested Develpment episode. Consequently, my hot cocoa consumption has dramatically decreased.
But no longer. In a stroke of genius, I mixed together all of the ingredients of my favorite hot cocoa (a la Cook's Illustrated), and added DRY MILK! You should have this on hand already if you're a bread maker (it makes for a nice, soft crumb in certain types of bread). You add enough dry milk to make up the recipe, omit the vanilla (I'm still trying to figure out how to get this back in) and you have a very good, very cheap hot cocoa mix. Put it in a plastic bag (I even mixed it in the bag) and add a label: JUST ADD WATER!
Hot Cocoa Mix
Makes 4-1 cup servings
6 tablespoons Dutch-processed cocoa
4 heaping tablespoons sugar
Small pinch salt
1 cup dry milk (I used nonfat, it was still good)
1. Mix in plastic bag and shake. Really people, it doesn't get any easier.
2. Use ~4 Tbs mix for each cup of hot water.
That's it. All done. The best part: You can make your own flavored cocoa. Just add any dry ingredients. I'd like to make one with cinnamon and ancho chile pepper; my mouth is watering just thinking about it. How about very finely crushed candy canes for peppermint? Does it get any more Christmas?
I would absolutely love to hear peoples' other flavor ideas, as well as a way to get the vanilla back in. The only two ways I can think of is making flavored sugar (which seems overly complicated), or crushed tic-tacs (which I don't think would taste very good).
(Picture courtesy of Wikipedia.)
Wednesday, September 5, 2007
The Art of the Stir Fry

A stir fry is the perfect weeknight meal. It's easy, it's normally healthy, and if done right it can taste phenomenal. But many out there think that a stir fry is just throwing some ingredients in a wok and adding soy sauce. I strongly disagree.
For years, I wondered why my stir fries would never taste like the wonderful Chinese food I could get in a restaurant. It seems pretty simple, and I could always get a decent stir fry, but it was never anything to go crazy about.
But through a little bit of trying and with vital help from a friend with Chinese relatives, I have made many steps towards a more perfect stir fry. I've been making good, consistent stir fries for a couple of years now, and figured it was about time to write it down, along with some helpful general rules about a good stir fry.
First the rules. These are things that I have found almost always give a good stir fry, and without which invariably result in disappointment.
1. Stir fry with a very hot wok. This is especially important with vegetables, such as broccoli. You want to fry/burn the broccoli, not steam it. Ideally, when cooked, the broccoli will be slightly brown in parts while generally tender crisp. Trust me. Slightly burn the broccoli. It will get a nutty flavor that is essential to the taste. A hot wok is also important for frying tofu.
2. Stir fry all parts separately, then add together at the end. This is a trick I learned from Cook's Illustrated and have not gone back since. It is for the same reason as number 1. You only have so much heat, so you don't want to crowd your wok.
3. Lots of garlic. Not much explaining. Chinese food seems to use lots of garlic. You should too. I don't know if you can have too much (haven't had the guts to try).
4. Sugar. This is key. I only found this out from my friend. Never would have figured it out on my own. DO NOT OMIT.
5. Corn Starch. No one likes a watery sauce. Make it stick to everything and be good.
6. Only use a few ingredients. I used to make stir fries with carrots, peppers, mushrooms, onions, garlic, bok choy, tofu, peanuts, etc., etc. They never tasted good. I figured out, there were just too many flavors going on. I suggest 3-4 max.
Along that vein, I give you:
Kurt's Broccoli and Tofu Stir Fry (serves ~3-4)
1lb tofu, cut and dried with paper towels (as firm as you can get it, please)
1 large head broccoli (cut into nice size pieces)
3 small onions (I like sliced)
3 med-large cloves garlic (sliced, otherwise they will burn in your hot wok)
1/2 cup soy sauce
1/4 cup brown sugar
2 Tbs corn starch
1/4 tsp pepper flakes
pinch ginger powder (you can use fresh if you keep it)
vegetable, canola, or peanut oil for cooking (no olive oil please, it has a low burn point)
cooked rice (for serving)
0. Mix soy sauce, sugar, ginger, and corn starch and mix until there are no more corn starch lumps.
1. Get that wok/frying pan screaming hot. Note: This recipe cannot be accomplished on a non-stick pan due to its inability to brown food and the danger of heating one this hot.
2. Add a Tbs or 2 of oil and add your cut tofu. Fry until nicely browned. Keep it moving so that it doesn't stick much. Put on plate when done. Carefully wipe pan with paper towels to remove bits of tofu.
3. Add a little more oil and repeat with broccoli. Remember, tender crisp and a little brown and then remove to a plate.
4. Add onion, garlic, and pepper flakes to still-hot pan. Once these are all nicely cooked (slightly brown again) add everything back into the pan and toss.
5. Take off heat and add sauce. Stir quickly long enough to let sauce turn clear. Server immediately with rice.
That's all there is to it. Just watch out, because once things start frying, things go fast.
Happy frying!
Wednesday, August 29, 2007
Fava bean sweatshop

The times I've tried fava beans in the past, I've liked them quite a bit. I've
 only had fava beans that had been dried, soaked, and cooked (they are usually yellow), but I had seen various descriptions of fresh fava beans as being much better than the dried ones. As far as I knew, the fresh variey were to be found only in prohibitively expensive and intimidating restaurants. I had never seen fresh fava beans for sale before, so I tried my hand at growing some this year. So far, my plants are mostly flowers and a few immature pods. This weekend, I spotted some at our local yuppie farmstand and bought a bagful to finally see what the hoopla was about.
I remembered the last time I tried to prepare dried fava beans - lots of peeling the tough skin off the individual beans after cooking, plus they're kind of hard to cook evenly. I figured that with fresh beans, there would be less work because maybe the skins on the beans would be edible. Nope. I still had to peel the beans after blanching them. And before peeling the beans, they had to be removed from the pods. This is why they're only served at the fancy-pants restaurants because they're pretty labor intensive. I don't think that the preparation of fresh favas was significantly more involved than dried ones, though. Certainly it takes less planning since you don't have to soak them, and they cook evenly when fresh.
Another discovery was that a fava pod looks huge, but it's almost all pod, spongy pod lining, and bean shell. After de-podding and shelling the giant bag of beans, you're left with a small handful of bright green favas. But they are very good - lovely texture and flavor, not grainy at all like some frozen large beans I've had. I've recently seen the rule of thumb that 1 lb of pods yields 1 cup of shelled beans. Hmn, maybe I should have planted more than four fava bean plants and less than four zucchini plants.
I will follow Jeshica's lead of asking questions at the end of a post to get the comments rolling in: What else have you made that made you think, "Damn, that was fiddly and ridiculously involved. But heck, this is pretty tasty!"?
The NPR method of blanching beans is as follows: First remove the beans from the pods. Bring enough water to a boil to cover the beans. Drop beans in boiling water for 30 seconds, then immerse beans in cold water. Peel beans.
I have no idea whether fresh favas are ever traditionally used in ful nabed, but I thought it was good:

Ful nabed (Egyptian fava bean soup),
based on a recipe from Sundays at the Moosewood Restaurant
(sorry for the crappy picure; the sun went down)
1 c chopped onion
2 garlic cloves, pressed
1/4 c olive oil
1 tsp ground cumin
1.5 tsp sweet paprika
1/4 tsp cayenne, or I used a random assortment of finely diced seeded chili peppers from my garden
2 bay leaves
1 carrot, finely chopped
1 c fresh tomatoes
3.5 c vegetable stock*
2 c blanched fava beans**
1/4 cup flat leaf parsley
3 tbsp fresh lemon juice
salt and black pepper to taste
mint leaves to garnish
*Being cheap and lazy, I keep a jar of vegetable "Better than Boullion" in my fridge, which is a couple steps above using boullion cubes, is pretty common in supermarkets, and no I don't really want to think about what sort of preservatives must be in there.
**See above instructions for blanching fresh favas. I only had 1 cup - should have bought more!
In a soup pot, saute the onions for a few minutes. Add garlic and saute until onions are translucent. Add cumin, paprika, cayenne, bay leaves, and carrots; cook on medium heat for 5 minutes, adding roughly a teaspoon of water at a time while stirring to prevent spices from burning by deglazing the pot. Stir in chopped tomatoes. Add vegetable stock and simmer until the carrots are tender, about 15 minutes.
Remove from heat, add cooked fava beans, parsley, and lemon juice. Add salt and pepper. Garnish with mint.
Serve with... chianti, of course (groan!).
DISCLAIMER: Please note that there is a serious genetic blood condition called favism. G6PD deficiency can result in red blood cell destruction after ingestion of fava beans (it is more prevalent amongst certain ethnic groups, and the gene for G6PD deficiency is on the X chromosome, hence it is expressed much more frequently in men). Don't say I didn't tell you so when your RBC's start exploding.
Monday, August 27, 2007
State Fair

Admittedly this is the first state fair I have attended, but my impression is that most state fairs are half agriculture show and half carnival. Both of these involve food, so I thought my sojourn to the New York State Fair this Saturday was worth mentioning.
I was volunteering, so I didn't get to roam as much as I might have, but I did make it to the dairy building, which was very impressive if you're looking for edibles. In addition to as much information as one could want on locally produced cheese, there were actually milk fountains (think beer taps flowing a very different substance) and the famous butter sculpture.
Food called out from other parts of the fairgrounds as well from the giant soft serve cone shaped ice cream shops to the smoke coming off some wonderful smelling chicken BBQ in a poultry pavilion. I got some excellent BBQ from a place that advertised an ox roast, an apple dumpling with ice cream that I couldn't finish (not for lack of trying), and a nicely tangy lemon italian ice. The only disappointing thing was a frozen lemonade which I don't think had ever seen a lemon.
There were also some fresh cut french fries which brings me to a bit of a tangent. On the table with the condiments was a spray bottle of vinegar. This is the second place around here I've seen vinegar for fries, and it's a welcome addition in my opinion, and while the spray did give me a nice coating on top of the fries, as soon as I ate past the first layer it was gone. Very disappointing. I remember clearly when I was a second grader my teacher telling us about serving the fries in a paper bag so you could salt and vinegar them, and then SHAKE!
Alright, enough of that. Suffice to say, I came back quite full despite making slime for 90% of the time I was there. Did anyone else make it to the State Fair, here or anywhere else? It's going on next weekend too, you know, and that apple dumpling was really, really good.
Sunday, August 26, 2007
Don't just drink, Think!

I'm Posting this in preparation of the (hopefully) many beer reviews that I and many of you (once again, hopefully) might be writing in the future. If many of you aren't into the beer thing, I just wanted to give a heads up on how many reviews work.
There are generally 5 components of a beer review: Appearance, Nose, Taste, Mouthfeel, and Overall Impression. These components are generally used by official beer judges certified by the Beer Judge Certification Program (BJCP, for short. Nerdy, eh?). I'll give a breif description of what these are.
Appearance: What does it look like? This does mean that you will have to pour out your beer into a glass; you can't do nothin' from a bottle. Note color. I've been told that you shouldn't hold it up to a light, but I do anyway; some beers have a REALLY nice color when held up to a light. This is also where you should note the head of the beer. Is it substantial? Does it quickly disappear? Just talk about how it looks.
Nose: This is a fancy term for the smell of the beer. Stick your nose right in the glass (not the beer) and take a good whiff. Give your impression (and let us know if it knocks you out).
Taste: Umm...taste the beer. How does it taste? You'll read a lot of reviews that list very faint traces of something-or-other, or notes of this-and-that. They'll often use a lot of other fancy talk. Don't be intimidated; they're usually making it up anyway. Note: All joking aside, this is an important component, actually, it's the most important one. Just think long and hard about what you are tasting. Don't rush it; let the flavors develop on your toungue and think of what you taste long after you have swallowed the beer. If you think you taste something, no matter how weird it is, make a note of it.
Mouthfeel: Ok. This may sound like an odd one. This is literally a judgement of the consistency and carbonation of the beer. Is it crisp? Full? Chewy? Sticky? All of these and more are appropriate descriptions.
Overall Impression: Some people list the final component as "drinkability". I think that this is important, but can be covered in your overall impression. This is also an area to discuss random things about the beer that you liked (or disliked) that don't really fit in any of the other categories. Did it have cool label art? chunky things floating in it (puposefully)? Did it give you the warm fuzzies for no discernable reason? Just let it all out.
I do have a couple notes for any future beer drinkers/reviewers out there. Do NOT drink your beer too cold. A cold beer will have little flavor and some beers are best at near room temperatures. Not sure where a beer's best temperature is? Look it up online, or pour one and drink it over a long period, sipping occasionally; see where its flavor profile is best.
So there you have it, a beer tasting guide. Do you have to think about each of these things everytime you have a beer? HECK NO! But if you seriously sit down to review a beer and using these criteria from time to time, you might start thinking about your beer a bit more when you drink it. It may be a good thing or a bad thing, but I, for one, love it.
Good health and good drinking.
Friday, August 24, 2007
In the Name of All That is Sacred
 Let's pretend for a moment that this pizza was good (which it really wasn't). Let's suppose it had my favorite topping (I like mushrooms, but they ain't it). Let's also imagine that they included those wonderful little hot peppers with the pizza that are so enjoyable (which they didn't).
Even in this wonderful fairyland, something is amiss.
Look at this pizza. Notice the strange horizontal and vertical markings across the pizza. These are "slices" into the pizza.
Now, could someone explain to me why someone would take a perfectly good, ROUND, pizza and decide to cut it into SQUARE slices??? Some art nouveau thing? A commentary of our society forcing people into their small cubicles? Some pizza maker who likes to buck the norm and "take it to the next level".
Pizzas are round. They should be in slices. Like pie. If you want square pieces, all laws of decency and sanity state that you must make a square (I believe it is called Sicilian style) pizza. Otherwise you have pieces with lots of crust, no crust, a little crust. It is insanity. To paraphrase Walter: "This isn't 'nam. There are rules"
Please, someone teach these people how to make a pizza and end this cruelty. I think I'm going to be sick.
Save some time for...

Okay, here we go. Quick sappy rant:
Life goes by fast. NPR is always on during breakfast. Work is always so boring. The TV somehow is always on during supper.
These are not criticisms or complaints, it's just the way things are sometimes.
Take some time. Have a glass of wine, a good meal, and be sure to light a candle. It doesn't matter if the picture in you dining room has fallen down. Ignore it.
Pretend you're in a fancy restaurant even if you are serving frozen garlic bread. I'm sure they do it sometimes too. Make someone their favorite dish (one of Julie's is pasta with vodka sauce), buy a slightly more expensive wine than normal (this one was $10, no comments please) and enjoy the meal with that special person.
Let them be a friend, coworker, significant other, child, whatever. Just enjoy it with someone.
Talk, laugh, and most of all enjoy the food. We can eat for sustenance, or we can use food to improve our lives. This meal cost about 15 bucks for the two of us. If you can find entertainment for less than that, you're a liar and a thief.
Keep cooking, keep eating, and keep having fun!
Peppers and Stuff(ing)

From time to time, I like to make stuffed peppers. They're a really fun food: they're fun to make and to eat, and I've always loved food that comes in a type of packaging. I think they are an old standard you can really play with (ingredient wise) as long as you keep the two core components: a pepper and some stuffing. As I don't make them too often, I've yet to perfect the recipe. I'm sure that everyone has either their own recipe/opinions, I thought I would present my current recipe for suggestions.
I also have to apologize for the ambiguous measurements. I'm a bit of a kitchen cowboy, and I'm writing down the recipe after-the-fact.
Vegetarian (did I mention they are vegetarian?) Stuffed Peppers:
4 Large green bell peppers
2-3 cups rice (depends on how much you like rice; I love it)
1 can diced tomatos (flavored optional)
1 can black beans
1/2 cup salsa
1/2 cup cheddar cheese, shredded
dash crushed red peppers
garlic powder TT (I use about 1/4t)
Chipotle Tobasco TT
salt & pepper TT
1. make rice according to directions. Meanwhile, cut caps off peppers and clean out seeds, including from the caps!
2. mix about 1c. of cooked rice with can of tomatos, beans, 1/4 c. cheese and 1/4 c. salsa. Add red pepper, garlic powder,Chipotle tobasco, salt and pepper to taste.
3. Put remaining rice into baking dish, creating nests for peppers (if you have any filling left after stuffing peppers, mix in with this rice). Stuff peppers and place in rice. Cover with remaining cheese. Put caps on peppers (will seal them to a degree). Distribute rest of salsa over rice, as well as more Chipotle Tobasco to taste. Lightly drizzle olive oil (or I guess, lamp oil, according to an earlier post) over the lot to prevent drying out.
4. Bake in 350 degree oven for 1 hour (I did about 35 minutes and they could have used more) or until peppers are tender.
Remove and enjoy with a good beer or cheap white table wine (as we did in my case). I serve them whole, but cut one open for a better picture of the innards.
Heh, innards.
Tuesday, August 14, 2007
Pita Perfection

I wasn't going to post tonight's meal, but I had a great thing happen.
I decided to make a meal of a bunch of mediterranean-like food. Hummus, cous-cous, cucumbers, and pitas. One thing: no pitas.
So, I pull out Bernard Clayton's New Compete Book of Breads. In it, I found a wonderful recipe for pitas that I felt I had to share. Now, I'm not saying this is the perfect pita recipe, but it is very, very close. And it takes...wait for it...about 35 minutes to prepare. With rising. Enough said. My Kitchen Aid mixer helped, but it would be pretty easy by hand as well. (It would just take a little longer to knead.)
2 1/2 cups flour (it calls for bread, but I used AP (all-purpous)
2 tsp salt
1 Tbs sugar
1 package dry yeast
2 Tbs oil (Olive oil preferred. Here is where I use my machine oil.)
1 cup hot water (120º-130ºF)
Eight 7" squares of aluminum foil.
1. Mix 1 cup flour with dry ingredients. Add oil and hot water. Beat for ~3 minutes. Stir in balance of flour, 1/2 cup at a time until you get a very soft dough. (I used 3 cups flour this time.)
2. Knead for 6 minutes or so. If using the mixer, do the last minute by hand.
3. Preheat the oven to 500ºF (yes 500!). Divide dough into 8 pieces (I did 6 because apparently, I can't count). Roll into balls an dlet rest for 20 minutes.
4. Flatten each ball and roll into ~6" diameter disk (don't worry if they aren't round). Place each disk on a piece of foil.
5. Carefully place 2-3 at a time in the oven on the middle shelf. Bake 8 minutes.
6. Remove and wrap all the breads from a batch in a large piece of foil, stacked (this allows them to soften). Serve warm or let cool and freeze.
I don't know if I'll ever buy pitas at the store again.
Kitchen Cowboy Makes a Pretty Nice Sauce

So last semester, I took a cooking class with the illustrious Mr. Norkus. He had a certain disdain for people who jumped into the kitchen and just started mixing things together without any idea where they were headed or any recipe to lead them on their way. He called these people "kitchen cowboys". And generally I agree with him. We have a wonderful history of cooks who have made all the mistakes for us, and since Carême and his famous sauces in the early 1800s, people have been regularly writing down recipes, tips, and instruction for those that come after. It is in this tradition that this blog was created.
However, every once in awhile, we all like to be kitchen cowboys (or cowgirls if you prefer). We like to test our knowledge, push our skills, and fly forth into a dish using only what we have in our kitchen as our constraints. It was in this mindset, that I created the meal I am about to describe.
I had some frozen ravioli from Mama Rosie that I had just tried. I know frozen ravioli is normally pretty awful, but the Mama does all right and it's nice to have something other than angel hair for a change (without a significant increase in time).
The sauce? Red? Please something different! White? Too much with the cheese ravioli. Something citrus-y that is relatively good for me? Great! How do I make it?
Well lets try:
Extra-virgin olive oil (I used the good stuff someone bought as a gift=real olive oil (thanks Lisa!))
Orange juice would be best, but I only had limes
Garlic (of course)
Fresh dill? (Fresh parsley would have been better, but guess which one was in my refrigerator.)
Red pepper flakes (I refuse to make any Italian dish without these)
Parmesan
Put the oil in a pan, cook the garlic a bit, add the lime juice (I used one lime), a couple tablespoons of dill and taste. Not bad. Over the ravioli, a dash of red pepper, a bit of Parmesan and violà! Wonderful.
I finished with some fresh poached green beans from the local farmers' market with a little butter on them.
If I had only remembered to chill some white wine, this would have been the perfect summer meal.
Well, a kitchen cowboy can't be expected to remember everything. Beer is nice as well.
Monday, August 13, 2007
California Grilled Chicken Salad
On a recent girls only trip to the beach I had the best grilled chicken salad I have ever tasted. I tried to explain the taste of this wonderful salad to my husband but could not do it justice. So, I decided I would try to make this same salad for the two of us. I think I now have it down to a "T". I hope some of you will enjoy this recipe as much as we do.

2 skinless boneless chicken breasts
Italian marinate of your choice ( I used a garlic herb marinate I bought at a grocery store)
Pesto
Lettuce (I use red or green leaf but I am sure any kind would be great)
Salad ingredients of your choice. ( I use cucumbers, red onions, broccoli, cauliflower, fresh tomatoes and carrots)
Fresh mozzarella cheese (sliced)
And a balsamic vinegar dressing of your choice ( I use Neuman's Light Balsamic Vinaigrette)
Marinate the chicken for 3 hours or as long as you would like. ( I personally think the longer the better) I also marinate the portabella mushroom caps in another baggie for the same amount of time.
Grill chicken and the mushroom caps till they are done to your taste. While the chicken is grilling make your salad any way you like. After the chicken is done place the cooked chicken breast on top of your salad, spread pesto on top of the chicken breast followed by the portabella mushroom cap. I spread a little more pesto on top of the mushroom cap and then top it off with slices of mozzarella cheese. The cheese melts on it's own.
Dress the salad with the balsamic vinegar dressing and enjoy!!!!!!!
Saturday, August 11, 2007
Blueberries!

One of my favorite things about the months of June through October around here is the fresh fruit, and a nice outing can be to pick it yourself. If you're only going to pick one type of fruit or berry, I think blueberries are the way to go. You don't have to squat to pick them (strawberries) or climb ladders (apples, peaches) and there are no thorns to worry about (raspberries and their kin). They taste great, freeze really well, are good for you and a pretty color to boot.
It's several weeks into the season and I still haven't had a chance to go this summer, so on Wednesday I said to Alex "we're going" and took off work a little early. We went to Hall's Hills, a little blueberries only place outside of Cortland (2110 Tower Rd., if you're interested) with lots of great bushes, set back away from noisy roads. We picked about six and a half pounds of blueberries and stuck $5 in a mailbox with a slot on top for them. I swear, I'm never paying store prices for them again.
So what did I do with all those blueberries? Well ...
Six cups went into the recipe for blueberry cobbler that's free with registration on America's Test Kitchen's website. It was fantastic, hints of lemon and cinnamon do wonders to already tasty blueberries. I have to say though, that when it calls for a 9" pie plate they must mean deep dish, which admittedly is more common these days. However, mine are originals from my mother's kitchen and I ended up transferring the berries to a souffle dish or risking a huge mess in my oven.
Another cup went into my pancakes this morning. I got the recipe out of my Better Homes and Gardens Cookbook. It was basically a standard buttermilk pancake recipe plus:
1/4 t baking soda (in addition to what's there)
1/4 t cinnamon
2 T cornmeal
1 c blueberries
It was pretty good, and I'd recommend it, but perhaps not to die for.
What is to die for is my mom's Melt in Your Mouth Blueberry Cake, and that's what most of the rest of the berries (that didn't get set aside for eating) are destined for. Since I already have cobbler I froze them (without washing first!) in 1 1/2 c aliquots. I might use them for something else, but not likely. I don't know where the recipe came from originally, but my mom has made it ever since I can remember.
Melt-in-Your-Mouth Blueberry Cake
(This make a 8x8 in pan. It can be doubled in a 9x13 pan)
2 eggs, separated
1 c sugar
1/4 t salt
½ c butter *
1 t vanilla
1 ½ c AP flour **
1 t baking powder
1/3 c milk
1 1/2 c blueberries***
*The original recipe called for shortening, but I always use butter
**I've made it with cake flour. The texture is a bit better, but the blueberries tend to sink.
***Fresh is best, but frozen works well. I haven't tried buying frozen blueberries or canned ones.
Preheat oven to 350 degrees. Spray pans (or grease however). Rinse and pick over berries. Toss berries with a few tablespoons of the flour. According to my mom, this keeps them from sinking.
Beat egg whites til stiff. Add about 1/4 c sugar to keep them stiff.
Sift flour an baking powder together. Cream butter, add vanilla and salt. Add remaining sugar gradually. Add yolks and beat til light and creamy. Add dry ingredients alternately with milk. Fold in whites. Fold in blueberries.
Turn into greased pan. Sprinkle top of batter lightly with granulated sugar. Bake 350 50-60 minutes.
Enjoy!
Friday, August 10, 2007
You Can't Tell a Virgin Just by Looking

My world is spinning. All this healthy "Extra Virgin Olive Oil" that I've been using is really just lamp oil. I think I'm going to be sick.
Just listen to this:
http://www.npr.org/templates/story/story.php?storyId=12571726
And advice here:
http://www.npr.org/templates/story/story.php?storyId=12638597
Best/Worst line: "Anything under $10 per half-liter" is probably fake. For those of you who use English standard measurement, that's 10 bucks a pint. The stuff I get is $15 a half-gallon. I'm probably getting the stuff they use to lubricate the presses. I love the global economy. Anyone know of any olive farms in upstate NY?
Cinnamon Swirl Bread. Never buy Pepperidge Farms again. (Updated)

I love this bread. A little sweet, it can be breakfast, dessert, a snack, whatever. It's especially good with hot tea or a nice tall glass of milk. It should almost always be toasted if having with butter, or better yet, cut big slices and make the best french toast you've ever had.
This recipe comes out of Breaking Bread with Father Dominic, a wonderful book from a great PBS show. There aren't too many recipes in it, but the ones that are there are spot on. The book's less about making "authentic" or "rustic" bread and more about just making bread that disappears as soon as you make it.
The recipe calls for 1 cup of sour cream. In the past I have used sour cream, yogurt, or some mixture of the two. This time, I had about 1/4 cup of yogurt and 0 cups of sour cream. So I filled in the rest with milk. I actually think this hurt the taste and crumb slightly, so I would suggest using the yogurt or sour cream. I think the main problem is that without the sour cream, there is no fat. I also would consider doubling the filling amount. You really can't have too much cinnamon in a cinnamon bread.
This bread is great, because as an enriched dough (one that has eggs), the bread keeps fairly well.
Dough:
5-6 cups flour
1 cup milk
1 cup sour cream
3 Tbs shortening or butter (I don't use shortening in my cooking, but I'm sure it's good with it)
1/4 cup sugar
2 packs active dry yeast (if you use fresh yeast, you are going to have to modify the recipe)
2 tsp salt
1 Tbs vanilla
3 eggs beaten (at room temperature, please!)
Filling:
2 Tbs butter, softened
1/4 cup sugar
1 Tbs cinnamon
pinch nutmeg
1. Combine milk, sour cream, and butter in a saucepan over low heat until everything is melted. Remove from heat and cool until it is 120ºF-130ºF.
2. Combine 2 cups of the flour, the sugar, yeast, and salt in a large bowl and mix. Blend milk mixture, vanilla, and eggs in to flour mixer and beat for ~3 minutes. Add enough of the flour to make a soft dough.
3. Turn out dough an dknead for 5 minutes, adding flour as needed to make a smooth, elastic, SOFT dough. (Don't add too much flour.) Grease a bowl, put the dough in, turn it once on the bowl to grease the dough, and let sit for 1-1 1/2 hours until doubled.
4. Punch down and knead for a couple minutes to work out the air. Divide into 2 pieces. Roll out each into a 14" by 7" square. Spread softened butter on the dough leaving 1/2 inch edge. Combine sugar, cinnamon, and nutmeg and sprinke over the butter. Start with the short edge and roll the dough up tightly. NOTE: The tighter you roll the dough the more swirls you get. Pinch the edges tight and place in a greased 9x5x3 inch loaf pan. Do the same thing with the other piece of dough. Cover and let rise for 45-60 minutes, until nearly doubled.
5. 15 minutes before the dough is done rising, preheat the oven to 375ºF. Bake bread for 40-45 minutes or until top is golden brown and bread sounds hollow when tapped. Remove and let cool on wire rack. If you like, brush on some butter and sprinkle with cinnamon-sugar.
This bread is wonderful. Don't wait, just go make it.
Update: I've added the approximate amount of flour needed. This is just the amount that the recipe called for, I don't even measure my flour any more, I just look at the consistency. If you're beginning, just make sure you are close the amount of flour called for, and remember, you'll be adding more flour when you knead the bread, so don't add it all during mixing. Add enough to make a workable dough, and then add flour while kneading until you reach the desired consitency.
Thursday, August 9, 2007
Classic American Dinner (riiiight)

Okay, just a quick rant.
The reason people hate vegetarian food is because of vegetarian cook books. These people are trying to create dishes without having tasted the food they are attempting to recreate in years. In addition, I am very suspicious of whether they taste their recipes at all. All vegetarian recipes seem to be tasteless, low-fat, low-salt versions of what they should be. Everything tastes "fresh". Well, I'm sorry, but a sloppy joe shouldn't taste fresh, it should have a nice melding of tomato, grease, vinegar, sugar, and some chili flavor. It should not taste like fresh tomatoes! That is a different dish.
Ok, I'm sure I'll have this rant again, but for now onto the recipes.
There are four things going on here. We have a sloppy joe, french fries, and kale, with a nice homebrew stout courtesy of my brother. Before continuing, I'll have to say the beer was probably the most enjoyable part of the meal and I am continuing to enjoy it while I type.
As for the meal, I liked it. What's not to enjoy about a sloppy joe with french fries. The kale was a great idea and would have paired nicely, but I messed it up and it tasted horrible. I've done much better and will write about it when I make a good batch.
Sloppy Joe:
First, this is on a hot dog bun because that was all I had in the freezer. On top of it being a hot dog bun, it is a wheat hot dog bun that Julie bought. Hint: Hot dog buns should NEVER be made of whole wheat flower, EVER. Enough said. Also, this would have been much better on a hamburger bun; the meat to bun ratio was all wrong.
As alluded to above, the recipe I had out of the vegetarian book forgot a lot, which I had to add at the end to taste. I'll indicate these ingredients in Bold.
1 1/2 cups TVP crumbles
1 1/4 cups fake beef stock
~3 Tbs olive oil
1 onion, finely diced
2 cloves garlic, finely diced
1/2 bell pepper
1 28oz. can crushed tomatoes
~3 Tbs chili powder
~1 Tbs brown sugar
~1/4 cup cider vinegar
TT salt
1. You combine the boiling stock and TVP and let sit for 10 minutes off heat.
2. Sauté onion, garlic in oil. Add green pepper after a couple minutes. After they are all a little soft and brown, add TVP. Sauté on medium low, being careful to scrape up the meat from the pan to keep from sticking solid.
3. Add the tomatoes, chili powder, sugar, and cider. Simmer for ~10 minutes or so.
4. Remove from heat and serve.
I'd have to say, these were pretty close to real sloppy joes. I think the only way to get closer would be to really brown the meat well (for which you would need a very good cast-iron pan), and you would need more fat. There just isn't enough fat without the meat. Otherwise, though, they were very good.
French Fries
The french fries were a baked version out of Cook's Illustrated. I like these a lot. They are done in the oven, they taste awesome, and in the end you ingest about 3 Tbs of fat if you eat every single fry. Now that ain't bad. Seriously, just try them.
3 russet potatoes, cut lengthwise into ~10 wedges
Note: They hem and haw about needing to use russets. I used 4 white and they were fine.
But I cut them into 8 wedges instead of 10.
4+1 Tbs vegetable, canola, or peanut oil
3/4 tsp salt
1/4 tsp pepper
1. Preheat your oven to 475 and put rack on lowest position. Place cut potatoes in large bowl with hot tap water for 10 minutes. Meanwhile, coat large, heavy pan with 4 Tbs of oil and sprinkle evenly with salt and pepper.
2. Drain potatoes and place on a sheet with 3 layers of paper towels. Pat dry with other paper towels. Rinse and wipe out bowl and add potatoes with the last Tbs of oil. Mix.
3. Arrange potatoes in single layer on pan and cover tightly with foil. Bake for 5 minutes. Remove foil and bake for another 15-20 minutes, turning pan once, until bottoms of potatoes are spotty golden brown. Loosen taters with a spatula and use tongs to flip over on other side. Bake 5-15 minutes longer, until potatoes are nice and brown.
4. Remove to a sheet or plate with paper towels on it to drain the oil from the potatoes. Season with additional salt and pepper, if needed, and serve (with ketchup, of course).
That's all for now. Happy cooking!
Update: Sarah says that mustard is a key ingredient in Sloppy Joes. I added some to my sandwich and must agree with her whole-heartedly.
Subscribe to:
Comments (Atom)

